A tech & life blog written and maintained by Michael Lamb
Spring Boot App as a Service
Docker as a deployment strategy can have its shortcomings. One shortcoming I experienced recently was a breakdown in being able to make requests and receive responses from other michaellamb.dev apps and the Spring Boot demo app.
Instead of fighting with Docker (a tool I’m less familiar with) I opted to install the Spring Boot application as a service on a single node. This process could be automated using a CI/CD strategy and I may implement something using GitHub Actions in the future, but it is a more involved process than pulling a Docker image and running it as a container.
Baeldung wrote an article I used as a guide for installing the Spring Boot demo app as a service on Linux.
Maven Configuration
The first step is to enable the executable flag in the spring-boot-maven-plugin referenced in pom.xml
<configuration>
    <executable>true</executable>
</configuration>
See this change in the linked commit: update pom
Build
The second step is to copy the source code to the node and package it for deployment.
./mvwn clean package
It may be necessary to change directory permissions to allow the app to read and write using the file system.
System V Init
Using the traditional System V init, we create a symbolic link that we can use to reference as a service.
sudo ln -s /home/michael/demo/target/demo-0.1.0.jar /etc/init.d/demo
This link would need to be updated any time the jar is renamed
The app needs to be enabled by the system using the following command:
sudo systemctl enable demo
Once the system knows the app is available as a service, the service can be started.
sudo service demo start
Other commands are available using the standard service script: stop, restart, and status. Moreover, logs can be viewed under var/log/demo.log.
Published on 17 August 2022.
MagnoliaJS 2022
MagnoliaJS Conference 2022
The MagnoliaJS Conference was first founded by J.C. Hiatt in 2019. Since then, the conference has connected over 450 members on Discord alone! Web development and software engineering go hand in hand, so naturally I’m interested in a lot of the topics that are discussed at MagnoliaJS events. I plan on taking part in this exciting conference and I’m hopeful that you might find it interesting too! I’ve collected all the details I personally would care about here (I’m being selfish because I will be referencing this during the event myself and I’m just writing it ahead of time).
September 13th–14th, 2022
380 South Lamar Street, Jackson MS 39201
Jackson, MS events
- Opening night mixer @ The Westin Jackson (407 S Congress St, Jackson, MS 39201)
- Day 1 Evening Social @ MS Museum of Art (conference venue)
- Conference Afterparty @ JXN Tech District google maps, twitter
Speakers
- Dr. Nashlie Sephus twitter
- Michael Liendo twitter
- Waller Goble twitter
- Taylor Desseyn twitter
- William Hill twitter
- Todd Libby twitter
- Nerando Johnson twitter
- Domitrius Clark twitter
- Alex Riviere twitter
- Bekah Hawrot Weigel twitter
- Vince Falconi twitter
- Gant Laborde twitter
Sponsored by
- Cloudinary
- FlightControl
- CircleCI
- Morgan White Group
Published on 02 August 2022.
Using Discord4J in Spring Boot
It’s been a minute
I fell off the blog-writing momentum once JXN Film Club’s Summer Movie Nights kicked into high gear. Balancing blog-writing and a film club and a full-time job is a lot of time!
I’ve still been writing my own bits of software, as always, so I figured I’d give some insight into what I’ve been working on.
michaellamb.dev on Discord
If you’re reading this, you’ve probably seen the Discord server widget in the About Me section. Clicking on it or visiting this link will get you into the official michaellamb.dev server. Come chat with me!
Discord4J
I had a pretty simple problem which motivated me to stand up a Discord bot: I run a Valheim dedicated server for myself and other friends on Discord but beyond attempting to connect to the server in-game there wasn’t an easy way to see the server’s status or if anyone was online.
Connecting the Steam Web API to Uptime Kuma, my status montioring app, let me track the uptime of the game server. The app supports the creation of multiple status pages, so I added valheim.michaellamb.dev and pinned a message with connection details.
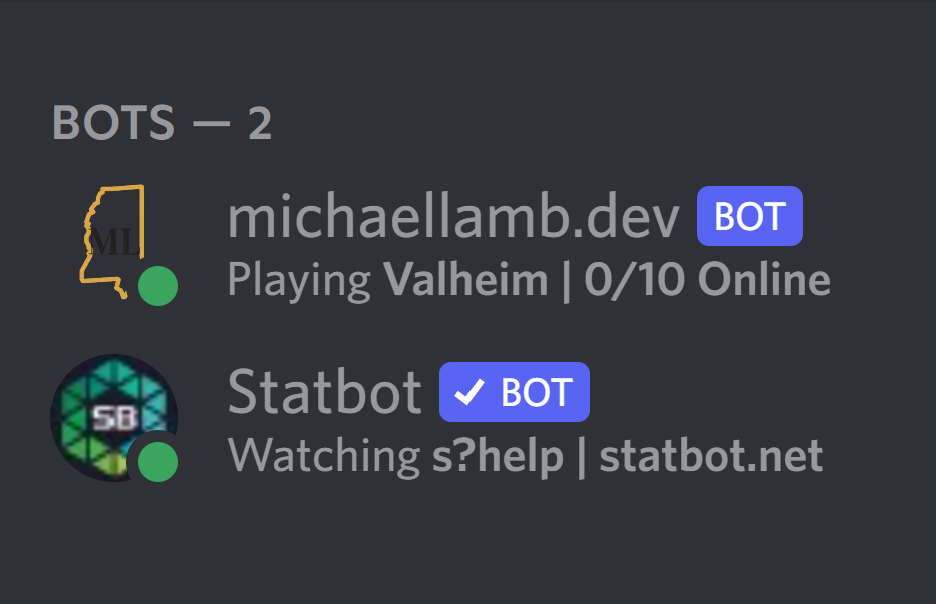
Where the Discord bot comes in is updating its presence to a status message. Bots and members alike can have a presence status, indicating a current activity. The michaellamb.dev bot has a presence shown below.
Agent Logic
I won’t go into the how to set up a Discord bot using Discord4J, their docs can do that better than I can. Let’s just look at the agent logic used to update the presence.
    @Scheduled(fixedRate = 1, timeUnit = TimeUnit.MINUTES)
    @Override
    public void checkValheimPlayerCount() {
        try {
            SteamGameServerStatusResponse response = steamGameServerService.getValheimInstanceStatus();

            if (response.isNotEmpty()) {
                SteamGameServerStatusResponse.Server valheimServer = response.getResponse().getServers().get(0);
                playerCount.set(valheimServer.getPlayers());
                String activity = String.format("Valheim | %d/10 Online", playerCount.get());

                LOG.info("valheimServer [{}], playerCount [{}], activity [{}]",
                valheimServer.toString(),
                playerCount.toString(),
                activity.toString());

                LOG.info("Updating ClientPresence with ClientActivity for Valheim");
                client.updatePresence(ClientPresence.online(ClientActivity.playing(activity)))
                .block();
            } else {
                LOG.info("Updating ClientPresence with ClientActivity for idling");
                client.updatePresence(ClientPresence.online(ClientActivity.streaming("status.michaellamb.dev", STATUS_URL)))
                .block();
            }
        } catch (Exception e) {
            LOG.error("An exception occurred", e);
        }
    }
The @Scheduled annotation tells Spring Boot to invoke this method on the given schedule, in this instance once per minute. Everything else is straightforward: we invoke steamGameServerService.getValheimInstanceStatus() and store it in response.
It may be helpful to know what Steam Web API sends back in a response here before moving on, so I’ve included the response that we should receive when the Valheim server is up.
{
    "response": {
        "servers": [{

            "addr": "173.235.136.46:2457",

            "gameport": 2456,
            "steamid": "90158276832560132",
            "name": "michaellamb",
            "appid": 892970,
            "gamedir": "valheim",

            "version": "1.0.0.0",

            "product": "valheim",
            "region": -1,
            "players": 0,
            "max_players": 64,
            "bots": 0,
            "map": "michaellamb",
            "secure": false,
            "dedicated": true,
            "os": "w",

            "gametype": "0.208.1"

        }]
    }
}
If the response comes back with an empty array of servers then we consider the game server to be down. If this happens, then bot presence is updated to an “idling” fallback status. Otherwise, the bot looks at response.servers.players and updates the total number of players in the tracking variable playerCount.
You may be wondering whether this agent/business logic is designed with other servers in mind. The service layer which handles the request/response to and from the Steam Web API specifically filters by appid, meaning that only Valheim game servers will be returned in this particular response.
This simple task felt like a good introduction to using Discord4J. It’s well-supported and is compatible with the Spring ecosystem.
Future
I use Discord webhooks with Uptime Kuma to get notifications when services go up or down, but I’d like to be able to fetch other stats from Uptime Kuma that are only accessible via the dashboard. The dashboard is LAN only so I’d have to use my self-hosted VPN to be able to look at it. Future work may include integrating slash commands to the bot which fetches this data and displays it.
Lately
I love having happy plants pic.twitter.com/sNRtFTUpCx
— Michael Lamb he/him (@themichaellamb) July 11, 2022
Published on 13 July 2022.
GitHub Discussions - Spring Boot Demo App
Now Announcing GitHub Discussions
GitHub features a Discussions pane on code repositories so that communities can share thoughts and feedback without having to open a new issue.
This post is to announce that I want YOU to leave a comment on my announcement post over on GitHub. My blog is more informative than interactive (and I like it that way) but GitHub as a tool for organizing community around code is right up my alley. I hope you’ll join me and we can connect.
Follow this link to see the Discussion announcement.
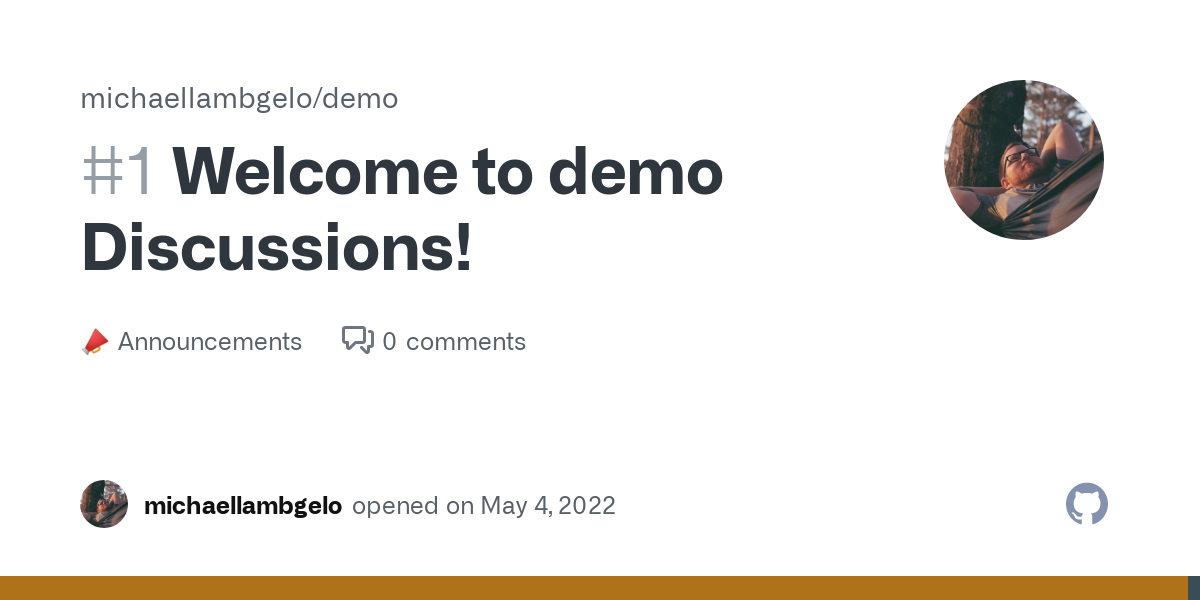
Leave a comment on my announcement post
And when you’re done, check out the repo! I’ve enabled Discussion on my Spring Boot Demo app and there’s simply no reason you shouldn’t pull the code, try it out yourself, and then come back to the Discussions pane to tell me what you learned.
BE KIND ONLINE
Published on 04 May 2022.
Valheim - Dedicated Server

Valheim
A brutal exploration and survival game from Iron Gate AB and published by Coffee Stain Publishing for 1-10 players, set in a procedurally-generated purgatory inspired by viking culture. Battle, build, and conquer your way to a saga worthy of Odin’s patronage!
The game was released Feb 2, 2021 and has received very positive reviews on Steam and in C Spire Gaming’s Discord server.
![]()
Some college buddies and I first played on a world we’d been passing around via Google Drive. I was then volunteered to host the world on a dedicated server and I wanted to build a small system to check on the status of the server such that I could make it easy for my friends to know its uptime status.
In version 1.14.0 of Uptime Kuma a new feature was introduced which enabled serving new status pages from an existing app instance. Utilizing this, I created valheim.michaellamb.dev which is a status page for our dedicated server.
Published on 19 April 2022.
About michaellamb.dev
Michael Lamb is a software engineer working at C Spire. If you have a blog-specific inquiry please create a new issue on GitHub. Feel free to fork this blog and build your own!Get to know who I am in my first post Hello, World!