A tech & life blog written and maintained by Michael Lamb
Swagger UI and Go
What is Swagger
Swagger is a suite of tools to generate and represent RESTful APIs. It promotes the OpenAPI 2.0 spec which describes an API using JSON representation in a specification file called swagger.json. Since YAML is a superset of JSON, the specification file can conform to YAML.
In my projects, I want to be able to generate swagger.json from an annotated codebase to serve using Swagger UI.
Swagger Tools
- go-swagger
- enables generating a Go client or server from an existing Swagger spec
- can scan an annotated codebase and generate a Swagger spec
- Swagger UI
- serves visual documentation of an API based on a given Swagger spec
Generating a Swagger spec
go-swagger is a CLI tool. The following is an example command for generating a Swagger spec
swagger generate spec -o ./swagger.json
Installing Swagger UI in a Go application
Based on the installation docs Swagger UI can be served as part of an application using plain HTML/CSS/JS.
How to serve plain HTML Swagger UI
The folder /dist includes all the HTML, CSS and JS files needed to run SwaggerUI on a static website or CMS, without requiring NPM.
- Download the latest release.
- Copy the contents of the
/distfolder to your server. - Open
index.htmlin your HTML editor and replace “««««https://petstore.swagger.io/v2/swagger.json”»»»» with the URL for your OpenAPI 3.0 spec.
What is the purpose
Reading and writing code is a big part of my daily life and the opportunity to put things together in Go is a fun break from the enterprise application development I do at C Spire. Swagger UI is a tool we use in our Spring/Spring Boot applications to easily share our API documentation with each other and the teams which integrate with us. This post is my personal documentation for how to integrate a tool I know and love in a new programming language.
Published on 22 October 2021.
Using OAuth2 in Go
Reference
![]()
"net/http"
![]()
"golang.org/x/oauth2"
![]()
"golang.org/x/oauth2/google"
Authorization Server Flow
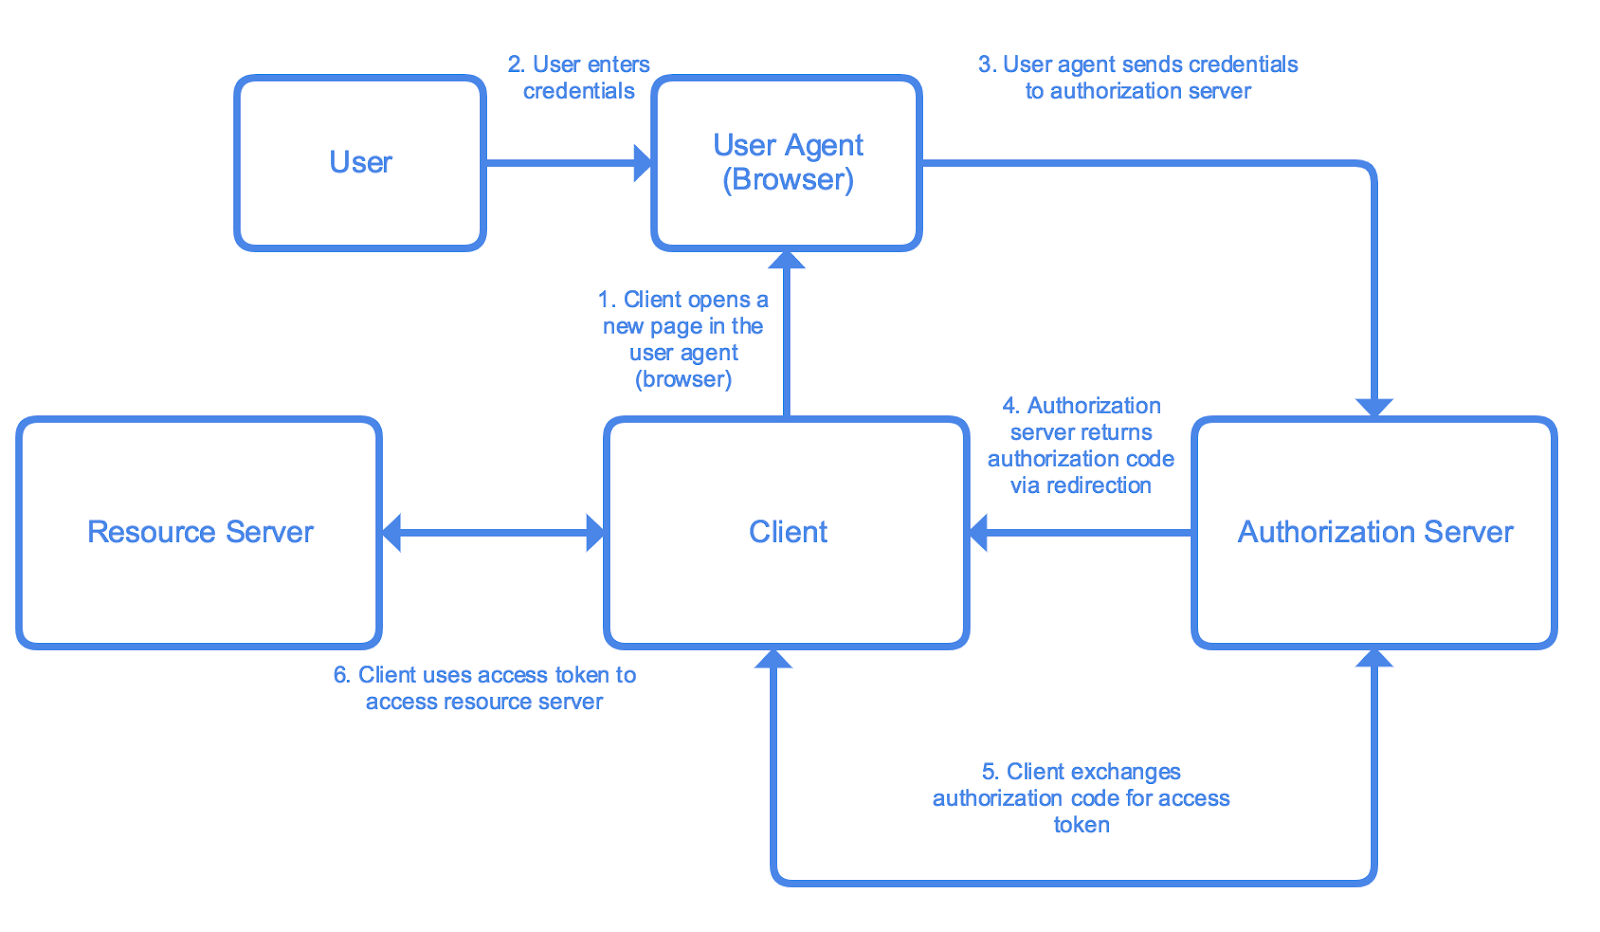
- A Go client will serve a redirect to a browser. This redirect will include a random state variable and a following redirect URL back to the Go client from the authorizing server.
- The user enters credentials into the browser (user agent).
- The user agent send credentials to the authorization server (
u := config.AuthCodeURL(oauthState)prepares the URL, a call tohttp.Redirect()acceptsuand the server redirects the browser). - Authorization server returns an authorization code (
r.FormValue("code")) via the redirection URL provided in step 1. - The Go client will exchange the authorization code for an access token (the client will store the access token in a cookie).
- The Go client uses the access token to access scoped resource servers.
A Simple OAuth Implementation
Download the oauth2 library for import.
go get golang.org/x/oauth2
The app structure I followed is pretty simple:
1. In main.go use net/http to start a server
main.go
package main

import (
"fmt"
"log"
"net/http"

"foundry-automations/handlers"
)

func main() {
server := &http.Server{
    Addr:    fmt.Sprintf(":8000"),
    Handler: handlers.New(),
}

log.Printf("Starting HTTP Server. Listening at %q", server.Addr)
if err := server.ListenAndServe(); err != http.ErrServerClosed {
    log.Printf("%v", err)
  } else {
    log.Println("Server closed!")
  }
}
2. Create a module /handlers and add two .go files
base.go<service>.gowhere<service>is a meaningful representation of the authorization server you are relying on (e.g., google apis)
3. Create a Handler
In base.go create func New() http.Handler {} and set up a mux with two handlers, "/auth/<service>/login" and "/auth/<service>/callback", then return mux. The helper functions passed as the second argument of mux.HandleFunc will live in your <service>.go implementation
base.go
package handlers

import (
{
    "net/http"
)

func New() http.Handler {
mux := http.NewServeMux()
// Root
mux.Handle("/", http.FileServer(http.Dir("templates/")))

// // OauthGoogle
// mux.HandleFunc("/auth/google/login", oauthGoogleLogin)
// mux.HandleFunc("/auth/google/callback", oauthGoogleCallback)
mux.HandleFunc("/auth/pco/login", pcoLogin)
mux.HandleFunc("/auth/pco/callback", pcoCallback)

return mux
  }
}
Published on 07 October 2021.
Error Handling
I am continuing to learn more about Go and its history.
The language follows idioms.
Idioms of Go
- get the job done
- one way of doing things
- be explicit
- build things by composing them
Fundamentals of Software Development
One of the most important aspects of my job is writing meaningful error messages. It’s something a lot of people don’t ever stop to consider: where do error messages come from?
Software developers create tools used by others and by nature of the broad interconnected tooling systems in computers and the internet at-large it cannot be difficult to imagine how collaboration is vitally important. Error messaging is how a software developer communicates with their users about expected and unexpected behavior. I believe that software which does not provide meaningful error messages (here’s what went wrong, here’s how to fix it) is not well-written software.
Error handling is a fundamental skill for software engineering.
Error Handling in Go
Review the following go packages for an example of returning an error. Source from golang.org
greetings.go
package greetings

import (
    "errors"
    "fmt"
)

// Hello returns a greeting for the named person.
func Hello(name string) (string, error) {
    // If no name was given, return an error with a message.
    if name == "" {
        return "", errors.New("empty name")
    }

    // If a name was received, return a value that embeds the name
    // in a greeting message.
    message := fmt.Sprintf("Hi, %v. Welcome!", name)
    return message, nil
}
main.go
package main

import (
    "fmt"
    "log"

    "example.com/greetings"
)

func main() {
    // Set properties of the predefined Logger, including
    // the log entry prefix and a flag to disable printing
    // the time, source file, and line number.
    log.SetPrefix("greetings: ")
    log.SetFlags(0)

    // Request a greeting message.
    message, err := greetings.Hello("")
    // If an error was returned, print it to the console and
    // exit the program.
    if err != nil {
        log.Fatal(err)
    }

    // If no error was returned, print the returned message
    // to the console.
    fmt.Println(message)
}
Notes
- the
loganderrorspackages are golang builtins - I would want to use constants for error messages, e.g.,
errors.New(UNEXPECTED_ERROR)orerrors.New(EXTERNAL_SERVICE_ERROR)however Go does not support this pattern since it alternates between camelCase and PascalCase to denote variables which are global to a file vs. global to a package (respectively)
Willow

Published on 04 October 2021.
Getting Started with Go
I’m working on some automation tasks and will be using golang to consume a RESTful API and generate reports on data. I’ve already had vscode installed on my personal computer but I also had a few things to do to get my environment set up for learning and iterating. For my full-time job I work using Mac OS and my PC is a Windows machine for gaming; this is the first blog post I’ve written from my PC!
Setting up VCS
Through the powerful features offered by the git version control system (VCS) I will be able to keep a public log of my golang areas of interest as well as use private repositories to solve problems and complete tasks. I installed Git for Windows with the option to also install git bash for Windows. I’m interested in seeing how compatible all of this is with the Windows Subsystem for Linux – which I love using!
Setting Up Repos
I added a new public repo called hello-go where I will document some of the tutorial code I find in a place where I can play around with it.
I also added a new private repo for code related to my automation task.
What’s Coming Up
C Spire Business is bringing back its premier tech event Bytes & Bites in Birmingham, AL (and beyond!) on 21 October 2021. If you’re a business or IT leader register now for this free event.

Published on 01 October 2021.
Ansible Installation
What is Ansible
Ansible is an IT automation tool provided by RedHat. It is designed to operate agentless, which means that nodes don’t need separate agent applications to be used in an Ansible automation.
Ansible runs playbooks which execute a series of tasks on a given set of hosts. Tasks are performed in order. It is supposed to be easy to use and understand so that anyone in an IT organization can read a playbook and know what it is doing.
Why do I want to learn Ansible
There’s a number of reasons why, rooted generally in the use cases Ansible is known for:
- Configuration management
- App deployment
- Provisioning
- Continuous delivery
- Security & compliance
- Orhcestration
Ansible Concepts
- Control node : any machine with Ansible installed
- Managed nodes : any network device / servers managed with Ansible
- Inventory : a list of managed nodes
- Collections : distribution format for Ansible assets (playbooks, roles, modules)
- Modules : the units of code Ansible executes
- Tasks : the units of action in Ansible
- Playbooks : ordered lists of tasks
Getting Started with Ansible
Installation
I refered to the latest Ansible community installation guide to figure out what I needed to do to get the tool working on my cluster.
Because Ansible is agentless, I only need a single control node to be able to run playbooks or ad-hoc tasks on managed nodes.
I installed Ansible on node1 using the system package manager
sudo apt-get install ansible
Creating an inventory
Ansible allows users to define lists of hosts as inventory.
On node1 I opened /etc/ansible/hosts which is the file containing the hosts I want to run playbooks on and added my cluster. This file has examples of how to add inventory. Following one of those examples resulted in this straightforward definition of my cluster.
[cluster]
node[1:6]
Let’s run a task
At this point I am ready to see whether Ansible is set up and working properly.
ansible all -m ping
This runs the ping module against all hosts in inventory.
As depicted below, all the hosts were successfully pinged!

Conclusion
I’ve got a control node ready to execute playbooks on the cluster.
The only other cluster-related topic I want to delve into now is Kubernetes, so that is what I’ll be working to set up this week.
Published on 28 March 2021.

About michaellamb.dev
Michael Lamb is a software engineer working at C Spire. If you have a blog-specific inquiry please create a new issue on GitHub. Feel free to fork this blog and build your own!Get to know who I am in my first post Hello, World!